

How To Wrap a Wrist
In this article, I’m going to cover one of the most common questions we get and see online: How to Wrap a Wrist.

Anyway, The wrist contains several large and small bones and tendons. If you sprain your wrist, it’s advisable to wrap it as soon as possible; this stabilizes the joint and facilitates recovery. Wrapping is also one of the more effective remedies for carpal tunnel pain, as well as inflammation and other hand related injuries.
Unfortunately, most people don’t know how to wrap a sprained wrist. One of the most common mistakes is to wrap below the palm but forget to wrap part of the hand as well. To effectively secure the wrist, you have to wrap it in a way that also restricts movement of the thumb, hand and, in some cases, some of the fingers. Follow the scientifically backed steps below to learn how to wrap your wrist for support.
How to Wrap Your Wrist:
Step 1: Wash your hand thoroughly and make sure that you have a clean bandage.
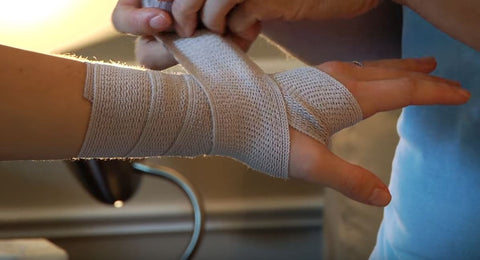
Step 2: Keep your hand and wrist straight. Start wrapping the bandage from below the wrist. This can be tricky if you’re trying to wrap your wrist yourself. While one hand is busy with the bandage roll, you may need to use your own body, a table or a wall to hold the bandage in place and keep wrap taut as you begin to roll.
Do not bend your injured hand forward or back as you wrap. The goal is to keep your wrist straight and protect it from further injury. The best approach to ask somebody to wrap your wrist for you to ensure the bandage is secure and the wrist is immobilized properly.
Step 3: If you have someone to assist you, ask them to wrap the bottom of the wrist first and then continue wrapping in a figure 8 pattern to stabilize the wrist properly. Go over the thumb and back down again. Ideally, the wrist should be wrapped all the way up to the point where your fingers meet your hand.
Step 4: Do not wrap the wrist too loosely as the bandage will come off while you are sleeping or going about your day. A loose bandage is like having no bandage at all as it does not support the joint. Inversely, if you wrap the bandage too tightly, it might obstruct the flow of blood (and oxygen) to the injury. Oxygen-deprived tissue doesn’t heal quickly. Tying too tightly can backfire and lead to serious complications.
Step 5: Secure the last bit of the bandage with a Velcro tape or pin.
Here’s a Video Demo of the process, for those who are more visual like me:
As you may have already realized, learning how to wrap a sprained wrist with a conventional bandage is not exactly hassle-free.
Wrapping a wrist presents several problems:
1) For starters, you will need somebody to help you out. This can be a problem if you live alone or if nobody is at home at that particular time. If you sprain your wrist and don’t have access to anything else, you should definitely wrap it up with a bandage as per the aforementioned 5 step method.
2) Heat and ice therapy (cryotherapy) is not possible with a conventional wrap. You have to hold the ice or heat pack against your wrist. This can be awkward as ice has jagged, sharp edges and doesn’t provide uniform coverage.
3) A bandage has a large surface area; which means that it offers more room for bacteria to breed and proliferate. Bandages soil quickly because they are continuously exposed to sweat, dust and dirt. If you don’t have a clean bandage, it may begin to give off an unpleasant odor.
You need to wash and dry your bandage regularly if you want to wrap your wrist everyday day or several times a week. You may need to use multiple wraps while you are waiting for your wrist to heal.
4) Often, it takes several minutes to wrap a bandage around your wrist. You need to fiddle with pins or tape to fasten it. A person who doesn’t have much experience with wrapping usually doesn’t get it right in one attempt. Hence, you have to adopt the trial and error approach. This is fine one in a while when you are using a bandage as first aid. However, it gets really irritating if you need to wrap often.
If you suffer from carpal tunnel syndrome, have sprained your wrist or you work out and want to prevent injuries, you’ll have to almost everyday. Do you want to fiddle with a long bandage all the time and waste several minutes simply sitting at one place holding heat and ice packs to your wrist?
If your answer is NO, then you should get yourself a specially-designed sprained wrist wrap, like the ActiveWrap Wrist Wrap. So what is an ActiveWrap and how is it different from the thousand other proprietary wraps on the market?

Well, ActiveWrap (wrist) won the ION award for the best sports medicine product of the year. So it is simply is the best ice wrap on the planet. Period.
An Activewrap Wrist Wrap is fast, easy to clean and efficient. It comes with state of the art heat and ice packs with anti-migration gel for uniform heating or cooling.
It is highly durable and actually cheaper than a bandage in the long run. It features a patented design which makes it usable for both right and left hands. Also, you don’t have to worry about size since this is a one-size-fits-all wrap.
All other Activewraps (knee, back, shoulder, ankle etc.) are available in several sizes.
It takes just a few seconds to put on any products from ActiveWrap. After you’re done, just rinse with fresh water and hang out to dry. All ActiveWraps have a 1 year warranty and an old fashion satisfaction guarantee.
So if you don’t like it for some reason, you can get your money back!
Don't believe us. Check out any of our products on ActiveWrap.com and read the hundreds of real customer reviews. We can’t wait to read yours!